Victoria 6 - Octane Standalone

Discuss or ask critique about your current works
Forum rules
Important notice: All artwork submitted on our public gallery forums gallery forums may or may not be used by OTOY for publication on our website gallery.
If you do not want us to publish your art, please mention it in your post clearly. (put a very red small diagonal cross in the left right corner of the image)
Any images already published on the gallery will be removed if the original author asks us to do so.
We recommend placing your credits on the images so you benefit from the exposure too, and use a minimum image width of 1200 pixels, and use pathtracing or PMC. Thanks for your attention, The OctaneRender Team.


For new users: this forum is moderated. Your first post will appear only after it has been reviewed by a moderator, so it will not show up immediately.

This is necessary to avoid this forum being flooded by spam.
User avatar
DOrdiales
Licensed Customer
Posts: 28
Joined: Sat May 31, 2014 8:32 am

Hello everyone,
Sorry for my English. These are renders I'm doing with DAZ's model Victoria 6, in the Standalone version of Octane.

Working Methodology
DAZ
1. I created a scene with Victoria 6 and several panels that I will use as lights in Octane.
2. I exported the scene to .obj file (with associated image maps).
OCTANE
1. I imported the .obj file and saved the scene in Octane (.ocs file).
2. I deleted the default Octane's materials associated with DAZ's surfaces.
3. For the skin I created a mix material, consisting of:
3.1. A difuse material, to which I have assigned DAZ's textures in properties difuse and bump.
3.2. A specular material, to which I have assigned DAZ's textures in properties transmission and bump. The colors for the reflection and scattering properties, I have copied from Tonysculptor's Skin R20 material.

Greetings
Victoria01.png
Victoria02.png
Victoria03.png
Victoria04.png
Victoria05.png
Victoria06.png
Victoria07.png
Victoria08.png
Victoria09.png
Victoria10.png
Victoria09.png
Victoria10.png
Victoria11.png
Victoria12.png
Last edited by DOrdiales on Fri Oct 17, 2014 9:35 pm, edited 13 times in total.
Stevenyang0430
Licensed Customer
Posts: 26
Joined: Thu Feb 13, 2014 10:01 am

Wow this is absolutely amazing!
Could you be a little specific about the setting on material (like the bump map strength for the skin)


Thanks a lot
Steven
User avatar
DOrdiales
Licensed Customer
Posts: 28
Joined: Sat May 31, 2014 8:32 am

Stevenyang0430 wrote:Wow this is absolutely amazing!
Could you be a little specific about the setting on material (like the bump map strength for the skin)


Thanks a lot
Steven
Thank you Steven.

First of all, I use three panels to create light.
Render - Tutorial00.png
Then I'm working with groups of surfaces. For example for the group of the face, therea are 3 surfaces: nostrils, lips and face.

1. I associate a Mix Material (for now, Amount = 1.000, to work only with the first material).
Scene - Tutorial01.png
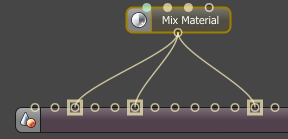
Scene - Tutorial01.png (7.57 KiB) Viewed 15404 times
Render - Tutorial01.png
2. First material.Diffuse:
-Propertie diffuse = RyBelle_face.jpg
-Propertie bump = RyBelle_faceBU.jpg
Scene - Tutorial02.png
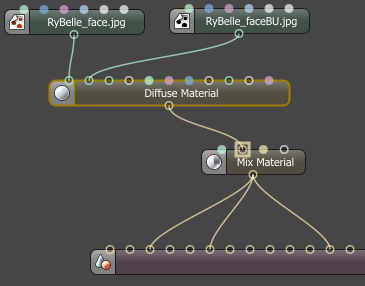
Scene - Tutorial02.png (19.34 KiB) Viewed 15404 times
Render - Tutorial02.png
I change now the value of Amount to 0.000, for working with the second material.

3. Second material. Specular:
-Propertie reflection = 0.540,0.580,0.650 (value copied from Tonysculptor's material)
-Propertie transmission = RyBelle_face.jpg
-Propertie bump = RyBelle_faceBU.jpg
-Propertie roughness = 0.250
-Propertie absortion = 0.100,0,0
-Propertie scattering = 0.230,0.370,0.600 (value copied from Tonysculptor's material)
Scene - Tutorial03.png
Render - Tutorial03.png
4. I change now the value of Amount to 0.400, to blend both materials:
Render - Tutorial04.png
5. Now, I repeat the same for the following groups of surfaces:
-Group 01: head, neck, hips, torso, nipples and ears: RyBelle_torso.jpg and RyBelle_torsoBU.jpg.
-Group 02: legs, hands, shoulders, forearms, feet, toenails and fingernails: RyBelle_limbs.jpg and RyBelle_limbsBU.jpg.

In these last groups, I only associate the texture with bump to the Specular material, assigning a value of 0.500 to the power texture property.
Scene - Tutorial05.png
Render - Tutorial05.png
6. I use the default settings for hair and mouth:
-Surfaces: gums, teeth, tongue and the map innerMouth => Material Diffuse => Propertie diffuse = RyBelle_mouth.jpg.
Render - Tutorial06.png
7. For the eyes, I use the following settings:

-Surface: eyelashes => Material difuse => Propertie opacity = RyBelle_lashes.jpg
-Surface: eyeReflection and Tear => Material Clear Cornea (Live DB Material)
-Surface: cornea => Material difuse => Propertie opacity = RyBelle_correfl01.jpg
-Surface: lacrimals, pupils, iris and sclera => Material difuse => Propertie diffuse = RyBelle_eyes01.jpg
Scene - Tutorial07.png
Render - Tutorial07.png
That's all!
Tugpsx
Licensed Customer
Posts: 1150
Joined: Thu Feb 04, 2010 8:04 pm
Location: Chicago, IL
Contact:

Great job. Thanks for sharing your techniques.
Win 11 64GB | NVIDIA RTX3060 12GB
raul_pier
Licensed Customer
Posts: 21
Joined: Sun Apr 13, 2014 10:26 pm

WOW, this is great.!!!!
Thank you for Sharing it... gracias.
i7 6 Core Processor | ASUS ROG GeForce GTX 1080 Ti 11gb x 2
Stevenyang0430
Licensed Customer
Posts: 26
Joined: Thu Feb 13, 2014 10:01 am

Thank you so much!
Now I can finally get to somewhere near your renders!
I'm still trying to adjust the lighting to approach a better realism (I didn't use the panels)
Is there a daylight in this render?
Steven
hibingo
Licensed Customer
Posts: 14
Joined: Wed Oct 10, 2012 11:13 am

Can you share your settings for daz export and octane import scaling? I still get a very dark skin tone and I think it has to do with the scale settings I'm using for both export and import.
User avatar
DOrdiales
Licensed Customer
Posts: 28
Joined: Sat May 31, 2014 8:32 am

Stevenyang0430 wrote:Thank you so much!
Now I can finally get to somewhere near your renders!
I'm still trying to adjust the lighting to approach a better realism (I didn't use the panels)
Is there a daylight in this render?
Steven
Steven, I use the default light product.
Light01.png
Light01.png (21.44 KiB) Viewed 15273 times
And, I use 3 panel as white light emitters: 1 frontal and 2 backs. I change power settings according to the scene.

I also play with the exposure value in Camera Imager.
Light02.png
Light02.png (13.03 KiB) Viewed 15273 times
User avatar
DOrdiales
Licensed Customer
Posts: 28
Joined: Sat May 31, 2014 8:32 am

hibingo wrote:Can you share your settings for daz export and octane import scaling? I still get a very dark skin tone and I think it has to do with the scale settings I'm using for both export and import.
DAZ Export
Export.png
Octane Import (default values)
Import.png
Try to vary the exposure value to brighten the picture.
hibingo
Licensed Customer
Posts: 14
Joined: Wed Oct 10, 2012 11:13 am

Thanks so much for the info. I'd been importing as centimeters and it was throwing everything off. If I used enough light to get good results on the skin everything else in the scene would be washed out.

Kudos to you for your efforts and kind replies! :D :D :D
Post Reply

Return to “Works In Progress”