Octane Solaris plugin 2021.1.4 - 04 26 22 [OBSOLETE]

Sub forum for plugin releases
Post Reply
BK
OctaneRender Team
Posts: 1436
Joined: Mon Oct 31, 2016 7:54 pm

Dear Octane community,


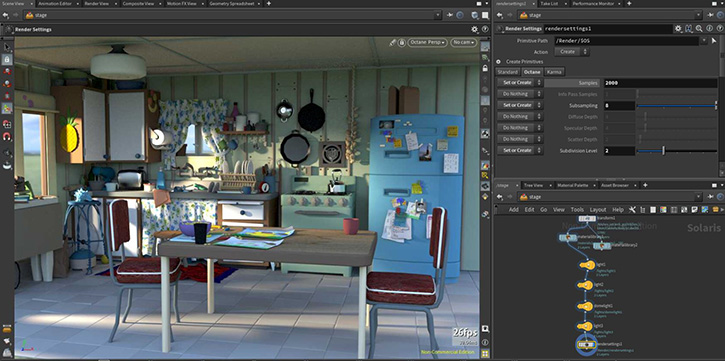
OTOY® is proud to announce the availability of the new DCC plugin OctaneRender for Solaris V2021.1.4 - for Houdini 19.0.561.

The world's fastest unbiased GPU rendering engine on CUDA and Metal now integrate completely with Houdini 19.0 Solaris.

What is OctaneRender for Solaris?
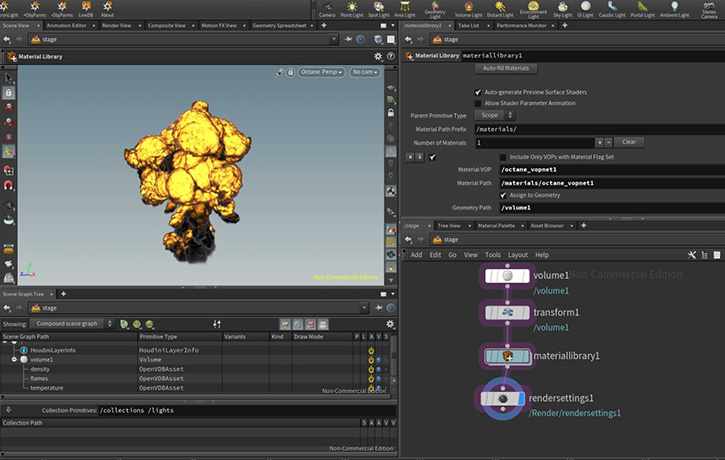
The OctaneRender for Solaris plugin is based on Pixar’s USD (Universal Scene Description) and Pixar’s Hydra API to empower artist workflows across look development, scene layout, lighting, and final rendering.

Image

Image

Pixar's USD pipeline
https://renderman.pixar.com/stories/pixars-usd-pipeline

- Please note: OctaneSolaris is merged with the latest OctaneRender 2021.1 for Houdini build 2021.1.4.0 for Houdini 19.0.561, so no need to install the main plugin

-Installation steps-

Insert the OctaneRender® plugin folder path to the houdini.env file. Houdini®creates this file after launching it for the first time.
On Linux and macOS® systems, append a single line to enable OctaneRender®:

HOUDINI_PATH = "/path/to/octane;&"

On Windows® systems, you need to set the PATH to point to the plugin bin folder as well:

PATH = "C:/path/to/octane/bin;$PATH"


Setting this environment variable outputs any error related to loading the OctaneRender® plugin on the command line for diagnosing installation problems:
HOUDINI_DSO_ERROR = 2

-Houdnin Packages/json installation steps-

- Please create a folder inside Documents\houdini19.0 and name it as Packages
- Open notepad or any text editor and use these lines

Code: Select all

{
    "enable" : true,
    "env": 
    [
        {
        "OCTANE_AUTOSPAREPARAMS" : 
        {
            "value": 1,
        },
            //location to your octane folder (example below)
            "OCTVERSION": "PATH\TO\OCTANESOLARIS\Win64FOLDER",
        },       
     
        {
            "HOUDINI_PATH" : 
            {
                "value": "$OCTVERSION",
            },

            "PATH" : 
            {
                "value": "$OCTVERSION/bin",
            },
            "PXR_PLUGINPATH_NAME" :
            {
                //if you have the solaris version installed 
                "value": "$PATH\TO\OCTANESOLARIS\dso\usd_plugins",
            }, 
        }
    ]
}
- Then Save as OctaneSolaris.json
- Please make sure to disable the .env paths

New features
To learn more about the new features and improvements of OctaneRender 2021.1.3, please check out the 2021.1.1 release post


- Changes since 2021.1.4 - 04 25 22 [Test]-
  • - Fixed crash when editing the distant light in an old scene setting the intensity to 0
  • - Improved transparencies importing from the USD preview surface

-Known Issues-
- Octane Color response is disabled because Hydra buffer expects linear output
- Light Linker is yet to be supported as we are investigating if we could assign the Octane light IDs internally.
However, the usual Octane light linking works as expected.


===================================
Enterprise Subscription Downloads
===================================
2021.1.4 Houdini 19.0.561

===================================
Studio Subscription Downloads
===================================
2021.1.4 Houdini 19.0.561

===================================
Demo build Download
===================================
2021.1.4 Houdini 19.0.561


Happy GPU Rendering !!


Your team
OTOY
Kind Regards

bk3d
User avatar
Ferdinand13
Licensed Customer
Posts: 154
Joined: Sun Apr 03, 2016 4:21 pm
Location: United Kingdom

Hello, I've got an issue with using a colour attribute with Octane in Solaris.

As you can tell, I've applied a colour attribute inside SOPs and then imported the geometry into Solaris. As I learned, the "Cd" attribute is converted into a Primvar named "displayColor", when you import SOP geo into the Solaris context, but the attribute remains essentially the same.
Scene.png
Using Redshift in Solaris, I can connect a Vertex Attribute node to the colour channel of a material and it respects the "displayColor" attribute as expected.

However, using Octane's Color Vertex Attribute node (the only one that seems to be doing the job) nothing happens. It seems as if Octane either know how to detect the Primvar.
MatLib.png
Any idea what's going wrong here? Am I doing the right thing, or would I have to follow a different approach? To clarify, there is no packed or instanced geometry at play here. These are all simple polygons that have been coloured with the "Cd"/"displayColor" attribute.

Thanks for letting me know :)
Custom PC, Intel Core i7-6800K, 48GB RAM, 3x MSI GeForce RTX 2080 Super Seahawk EK, Windows 10
Razer Blade Pro 17, Intel Core i7-10875H, 32GB RAM, 1x NVIDIA GeForce RTX 3080, 1x EVGA GeForce GTX 1080 Ti Hybrid (eGPU), Windows 10
BK
OctaneRender Team
Posts: 1436
Joined: Mon Oct 31, 2016 7:54 pm

Ferdinand13 wrote:Hello, I've got an issue with using a colour attribute with Octane in Solaris.

As you can tell, I've applied a colour attribute inside SOPs and then imported the geometry into Solaris. As I learned, the "Cd" attribute is converted into a Primvar named "displayColor", when you import SOP geo into the Solaris context, but the attribute remains essentially the same.
Scene.png
Using Redshift in Solaris, I can connect a Vertex Attribute node to the colour channel of a material and it respects the "displayColor" attribute as expected.

However, using Octane's Color Vertex Attribute node (the only one that seems to be doing the job) nothing happens. It seems as if Octane either know how to detect the Primvar.
MatLib.png
Any idea what's going wrong here? Am I doing the right thing, or would I have to follow a different approach? To clarify, there is no packed or instanced geometry at play here. These are all simple polygons that have been coloured with the "Cd"/"displayColor" attribute.

Thanks for letting me know :)
Hi Ferdinand13,

Thanks so much for reporting this.

Took a while to figure this out.
Would you please try to use the Color_vertex_attib node Name as ColorVertices instead of "Cd"/"displayColor" and see if it works for you?
If not, please PM me a sample so we could take a look!

cheers
Kind Regards

bk3d
User avatar
Ferdinand13
Licensed Customer
Posts: 154
Joined: Sun Apr 03, 2016 4:21 pm
Location: United Kingdom

Hey BK,

Yes this works! Thanks a lot :D

However, now I've got the following issue. The reason I'm using the colour attribute is to drive the texture offset for each little bar of wood.

In both Redshift and even Unreal Engine, piping a colour value into a transform/translate input means that it will use the red and green channels for X and Y, therefore giving me a different texture offset for each piece of wood.

In Octane, I've tried piping the Color Vertex Attribute node into the translation input of a Transform 2D node (that controls the albedo texture), but unfortunately it doesn't work.
Screenshot 2022-05-02 092124.png
I then tried to find any utility nodes that would let me turn the Color Vertex Attribute node's colour output somehow into the 3float input the Transform 2D node expects, but there doesn't seem to be any node that can do that either.

Would you have any idea, how I would be able to use those colour values I've got on my geometry to drive the texture offset as described? That'd be great!
Custom PC, Intel Core i7-6800K, 48GB RAM, 3x MSI GeForce RTX 2080 Super Seahawk EK, Windows 10
Razer Blade Pro 17, Intel Core i7-10875H, 32GB RAM, 1x NVIDIA GeForce RTX 3080, 1x EVGA GeForce GTX 1080 Ti Hybrid (eGPU), Windows 10
User avatar
Ferdinand13
Licensed Customer
Posts: 154
Joined: Sun Apr 03, 2016 4:21 pm
Location: United Kingdom

OK, I think I came a lot closer to the solution, thanks to some helpful forum members.

First things first, the setup I'm after can be achieved using Octane Render in Houdini's OBJ context. Here's how:
Screenshot 2022-05-03 190323.png
  • You create standard geometry (no instances) with varying vertex colours per element.
  • You add Octane's ObjParms to the respective object and add "Cd" to the "Vertex Vector Attrs." in the Attributes panel of these Octane object parameters.
  • You create an Octane material for this object and assign it at OBJ level. In this material, you import the Vertex Color attribute via Octane's "Color Vertex Attribute", then pipe that into the "rndm" colour input of an OSL projection node using the following code:

Code: Select all

//OSL Projection node for OctaneRender 3.08/4 and above//
//Random position scale and rotation uvs for scattered objects, by Beppe Gullotta//
//Use a Random Color Texture node in the RandomColorTex pin to drive the changes //
shader BGrandomUVproj(
        color rndm = 0 [[string label = "RandomColorTex",]],
        float offset_multiplay = 0 [[float min = 0, float slidermax = 10, float sliderexponent = 1,  string label = "Offset",]],
        float scale_factor = 0 [[float min = 0, float slidermax = 10, float sliderexponent = 4,  string label = "Scale Factor",]],
        float scale_multiplay = 1 [[float min = 0.01, float slidermax = 10, float sliderexponent = 4,  string label = "Scale Multiply",]],
    float angle = 0 [[float min = 0, float slidermax = 360, float sliderexponent = 4, string label = "Rotation Angle",]],
        int EqRot = 0 [[string widget="checkBox", string label = "90° Rotation",]],
        int FlipX = 0 [[string widget="checkBox", string label = "Flip X",]],
        int FlipY = 0 [[string widget="checkBox", string label = "Flip Y",]],
        int FlipSinc = 0 [[string widget="checkBox", string label = "Flip Sincro",]],
        output point uvw = 0,)
{
//Scaling     

        u = u/(scale_multiplay+rndm[0]*scale_factor); 
        v = v/(scale_multiplay+rndm[0]*scale_factor);

//Flip axis
    if (FlipX == 1 && rndm[0] < 0.5) { u = -u; }
    if (FlipY == 1 && FlipSinc == 0 && rndm[0] > 0.5) { v = -v; }
    if (FlipY == 1 && FlipSinc == 1 && rndm[0] < 0.5) { v = -v; }
//Sign
    color signR = 0;
    if (rndm[0] < 0.5) {signR[0] = rndm[0]*-1;}
    if (rndm[0] > 0.5) {signR[0] = rndm[0];}

//Offset
        point p = point (u + signR[0]*offset_multiplay, v + signR[0]*offset_multiplay, 0);

//Rotation
        point p1 = point(0.5, 0.5, 0);
    point p2 = point(0.5, 0.5, 1);

    point rotatedST = rotate(p, radians(angle*signR[0]), p1, p2);

//90° Rotation
    
    if (EqRot == 1 && angle == 0) {
        
        if (rndm[0] < 0.25) { rotatedST = rotate(p, radians(0), p1, p2); }
        if (rndm[0] > 0.25 && rndm[0] < 0.50) { rotatedST = rotate(p, radians(90), p1, p2); }
        if (rndm[0] > 0.50 && rndm[0] < 0.75) { rotatedST = rotate(p, radians(180), p1, p2); }
        if (rndm[0] > 0.75) { rotatedST = rotate(p, radians(270), p1, p2); }
    }
        if (EqRot == 1 && angle > 0) {
        
        if (rndm[0] < 0.25) { rotatedST = rotate(p, radians(0+angle*signR[0]), p1, p2); }
        if (rndm[0] > 0.25 && rndm[0] < 0.50) { rotatedST = rotate(p, radians(90+angle*signR[0]), p1, p2); }
        if (rndm[0] > 0.50 && rndm[0] < 0.75) { rotatedST = rotate(p, radians(180+angle*signR[0]), p1, p2); }
        if (rndm[0] > 0.75) { rotatedST = rotate(p, radians(270+angle*signR[0]), p1, p2); }
    }

//END
        uvw = rotatedST;
}
Tadaaa, you've now got randomly offset textures for each element of your geometry, driven by the random vertex colours for each of them.

Now, I've tried the same setup in the Solaris context, but I receive the following error:

Code: Select all

unknown Octane pin or attribute ID: HO_OSL_rawCode type: string
unknown Octane material node PinId: rndm
If I could fix this, my setup would work inside Solaris. Any idea how I can achieve that?
Custom PC, Intel Core i7-6800K, 48GB RAM, 3x MSI GeForce RTX 2080 Super Seahawk EK, Windows 10
Razer Blade Pro 17, Intel Core i7-10875H, 32GB RAM, 1x NVIDIA GeForce RTX 3080, 1x EVGA GeForce GTX 1080 Ti Hybrid (eGPU), Windows 10
BK
OctaneRender Team
Posts: 1436
Joined: Mon Oct 31, 2016 7:54 pm

Ferdinand13 wrote:OK, I think I came a lot closer to the solution, thanks to some helpful forum members.

First things first, the setup I'm after can be achieved using Octane Render in Houdini's OBJ context. Here's how:
Screenshot 2022-05-03 190323.png
  • You create standard geometry (no instances) with varying vertex colours per element.
  • You add Octane's ObjParms to the respective object and add "Cd" to the "Vertex Vector Attrs." in the Attributes panel of these Octane object parameters.
  • You create an Octane material for this object and assign it at OBJ level. In this material, you import the Vertex Color attribute via Octane's "Color Vertex Attribute", then pipe that into the "rndm" colour input of an OSL projection node using the following code:

Code: Select all

//OSL Projection node for OctaneRender 3.08/4 and above//
//Random position scale and rotation uvs for scattered objects, by Beppe Gullotta//
//Use a Random Color Texture node in the RandomColorTex pin to drive the changes //
shader BGrandomUVproj(
        color rndm = 0 [[string label = "RandomColorTex",]],
        float offset_multiplay = 0 [[float min = 0, float slidermax = 10, float sliderexponent = 1,  string label = "Offset",]],
        float scale_factor = 0 [[float min = 0, float slidermax = 10, float sliderexponent = 4,  string label = "Scale Factor",]],
        float scale_multiplay = 1 [[float min = 0.01, float slidermax = 10, float sliderexponent = 4,  string label = "Scale Multiply",]],
    float angle = 0 [[float min = 0, float slidermax = 360, float sliderexponent = 4, string label = "Rotation Angle",]],
        int EqRot = 0 [[string widget="checkBox", string label = "90° Rotation",]],
        int FlipX = 0 [[string widget="checkBox", string label = "Flip X",]],
        int FlipY = 0 [[string widget="checkBox", string label = "Flip Y",]],
        int FlipSinc = 0 [[string widget="checkBox", string label = "Flip Sincro",]],
        output point uvw = 0,)
{
//Scaling     

        u = u/(scale_multiplay+rndm[0]*scale_factor); 
        v = v/(scale_multiplay+rndm[0]*scale_factor);

//Flip axis
    if (FlipX == 1 && rndm[0] < 0.5) { u = -u; }
    if (FlipY == 1 && FlipSinc == 0 && rndm[0] > 0.5) { v = -v; }
    if (FlipY == 1 && FlipSinc == 1 && rndm[0] < 0.5) { v = -v; }
//Sign
    color signR = 0;
    if (rndm[0] < 0.5) {signR[0] = rndm[0]*-1;}
    if (rndm[0] > 0.5) {signR[0] = rndm[0];}

//Offset
        point p = point (u + signR[0]*offset_multiplay, v + signR[0]*offset_multiplay, 0);

//Rotation
        point p1 = point(0.5, 0.5, 0);
    point p2 = point(0.5, 0.5, 1);

    point rotatedST = rotate(p, radians(angle*signR[0]), p1, p2);

//90° Rotation
    
    if (EqRot == 1 && angle == 0) {
        
        if (rndm[0] < 0.25) { rotatedST = rotate(p, radians(0), p1, p2); }
        if (rndm[0] > 0.25 && rndm[0] < 0.50) { rotatedST = rotate(p, radians(90), p1, p2); }
        if (rndm[0] > 0.50 && rndm[0] < 0.75) { rotatedST = rotate(p, radians(180), p1, p2); }
        if (rndm[0] > 0.75) { rotatedST = rotate(p, radians(270), p1, p2); }
    }
        if (EqRot == 1 && angle > 0) {
        
        if (rndm[0] < 0.25) { rotatedST = rotate(p, radians(0+angle*signR[0]), p1, p2); }
        if (rndm[0] > 0.25 && rndm[0] < 0.50) { rotatedST = rotate(p, radians(90+angle*signR[0]), p1, p2); }
        if (rndm[0] > 0.50 && rndm[0] < 0.75) { rotatedST = rotate(p, radians(180+angle*signR[0]), p1, p2); }
        if (rndm[0] > 0.75) { rotatedST = rotate(p, radians(270+angle*signR[0]), p1, p2); }
    }

//END
        uvw = rotatedST;
}
Tadaaa, you've now got randomly offset textures for each element of your geometry, driven by the random vertex colours for each of them.

Now, I've tried the same setup in the Solaris context, but I receive the following error:

Code: Select all

unknown Octane pin or attribute ID: HO_OSL_rawCode type: string
unknown Octane material node PinId: rndm
If I could fix this, my setup would work inside Solaris. Any idea how I can achieve that?
Hi Ferdinand13,

thank you so much for the steps. we are able to replicate it on our side and has been reported to our developer.
We would do a release sometime next week!

cheers
Kind Regards

bk3d
User avatar
Ferdinand13
Licensed Customer
Posts: 154
Joined: Sun Apr 03, 2016 4:21 pm
Location: United Kingdom

Thanks a lot BK. Looking forward to it :D
Custom PC, Intel Core i7-6800K, 48GB RAM, 3x MSI GeForce RTX 2080 Super Seahawk EK, Windows 10
Razer Blade Pro 17, Intel Core i7-10875H, 32GB RAM, 1x NVIDIA GeForce RTX 3080, 1x EVGA GeForce GTX 1080 Ti Hybrid (eGPU), Windows 10
BK
OctaneRender Team
Posts: 1436
Joined: Mon Oct 31, 2016 7:54 pm

Ferdinand13 wrote:Thanks a lot BK. Looking forward to it :D
Hi Ferdinand13,

Oh no, thank you for reporting this issue :D
Please try this build!
viewtopic.php?f=141&t=79765

cheers
Kind Regards

bk3d
Post Reply

Return to “Releases”