This is the first stable release of 2019.1.
Please ensure that you have a NVIDIA driver version 419.x or newer.
Changes since OctaneRender 2019.1 RC5:
- Fixed universal material not updating when switching metallic mode.
- Fixed denoiser issues with layered material + fake shadow + diffuse layer on top of specular materials.
- Fixed incorrect render pass behaviour sometimes when there are no volumes in the scene.
- Fixed denoiser beauty pass getting garbage when certain denoiser passes are enabled.
- Fixed missing self-shadowing in the general and layered shadow passes.
- Fixed alpha channel in alpha passes if alpha is disabled in the kernel settings.
What's new in 2019
- OSL and procedural vertex displacement
- New rounded edges
- OSL Volume shaders
- Bloom/glare thresholding
- Improved volume AI denoiser
- Composite material node
- Layered materials
- AI upsampler
- Spectron volumetric lights
- Vertex displacement with auto-bump
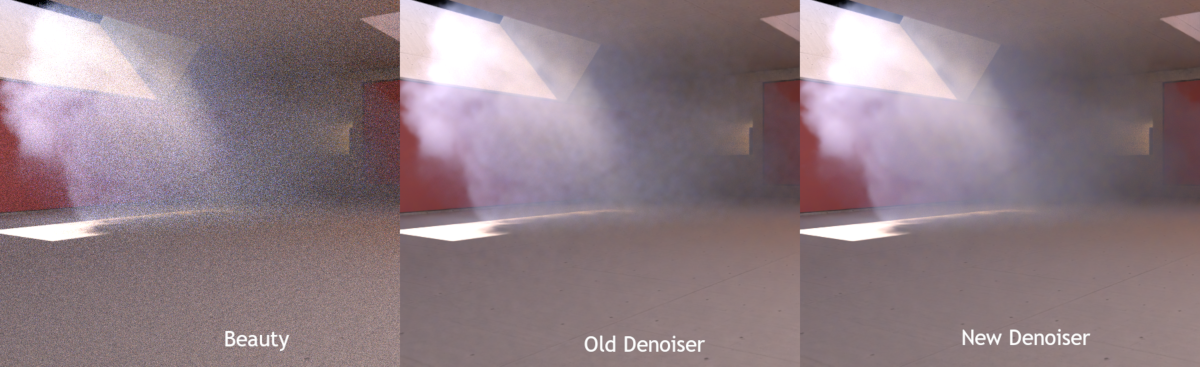
Improved volume AI Denoiser
The AI Denoiser has been upgraded with significant improvements especially in volume render. Below are a couple of examples, with the non-denoised image first, with the old denoiser output in the center, and
the new denoiser on the right. Please click to enlarge.

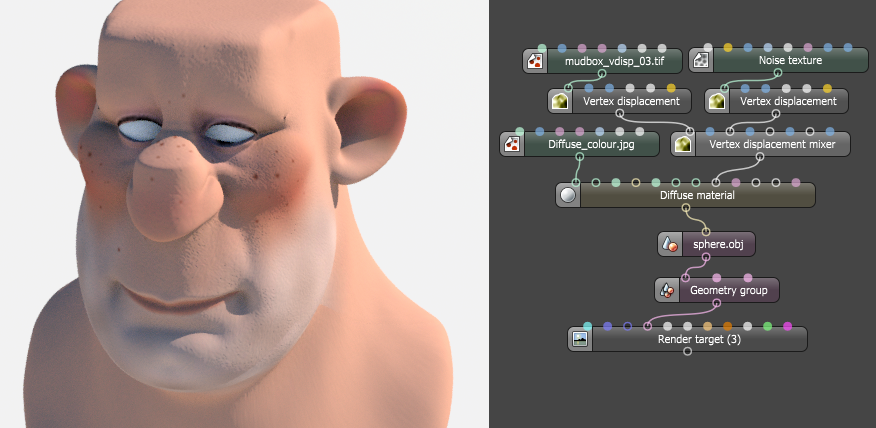
OSL and procedural vertex displacement (vector and height)
New nodes: Vertex displacement, and Vertex displacement mixer
You can now render procedural and OSL vertex displacement (either height or vector displacement) before rendering. This is a robust displacement system which doesn't suffer the same limitations as the old displacement system (which is now known as Texture Displacement). Octane also allows you to mix/layer vector/height displacement maps using the new displacement mixer node.
Vertex displacement will take any texture you provide, whether it's a procedural texture, OSL texture, or images. All projections are supported also. For image textures, set the gamma to 1.0. To avoid holes in the geometry the vertices should be shared between adjacent faces.

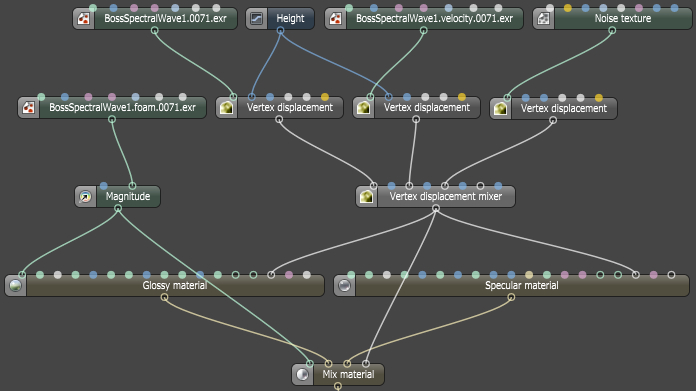
In the example below, we have three layers of displacement. The first two are vector displacement maps, and the third is a detailing height map.
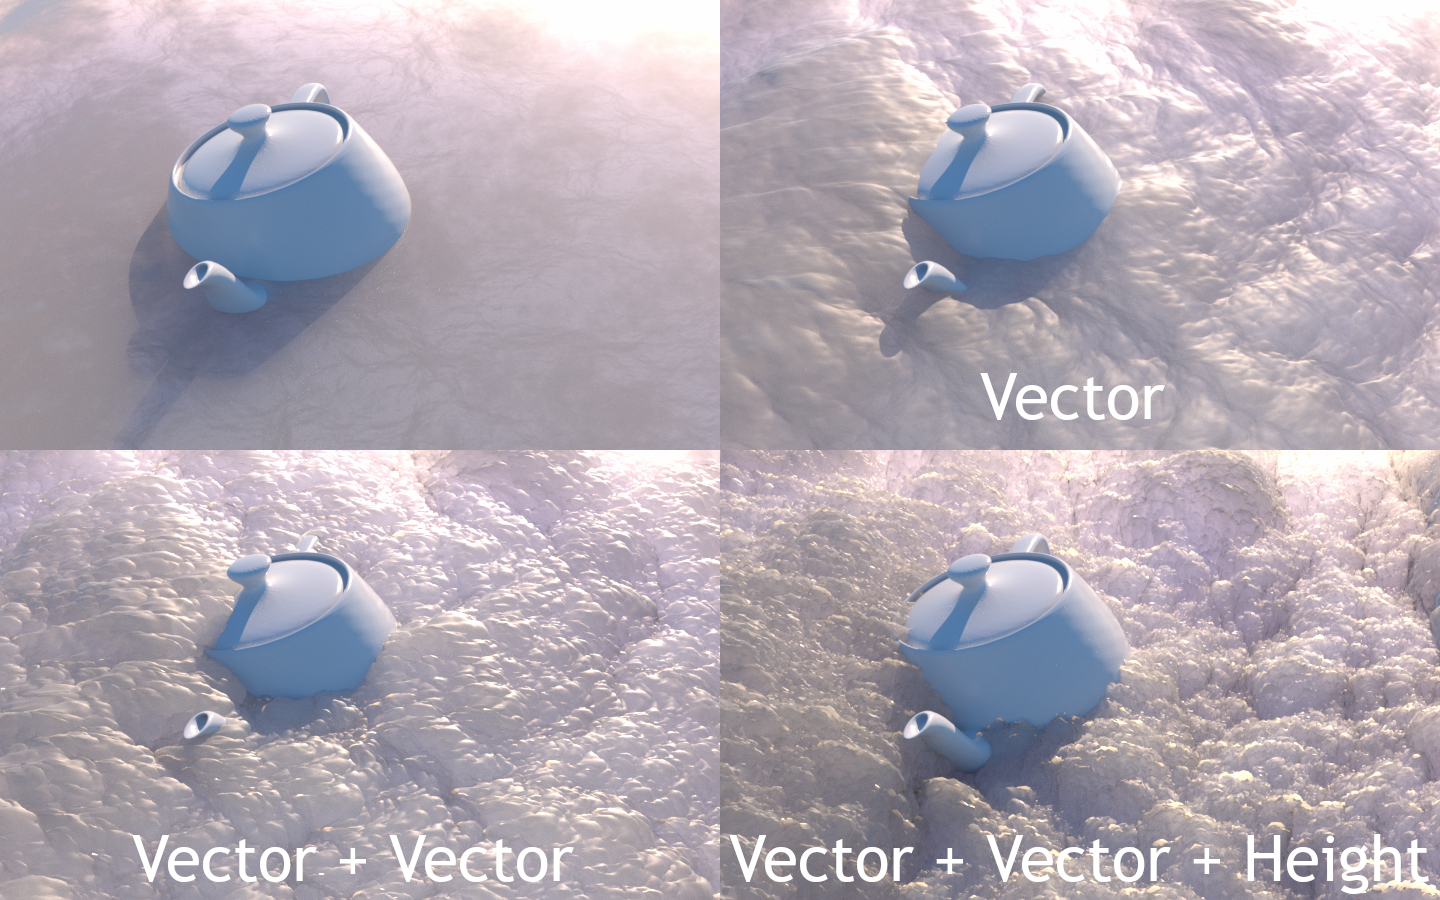
This gives you a lot of control over the final look.
Proper Mudbox vector displacement maps can also be used, which work in tangent space:
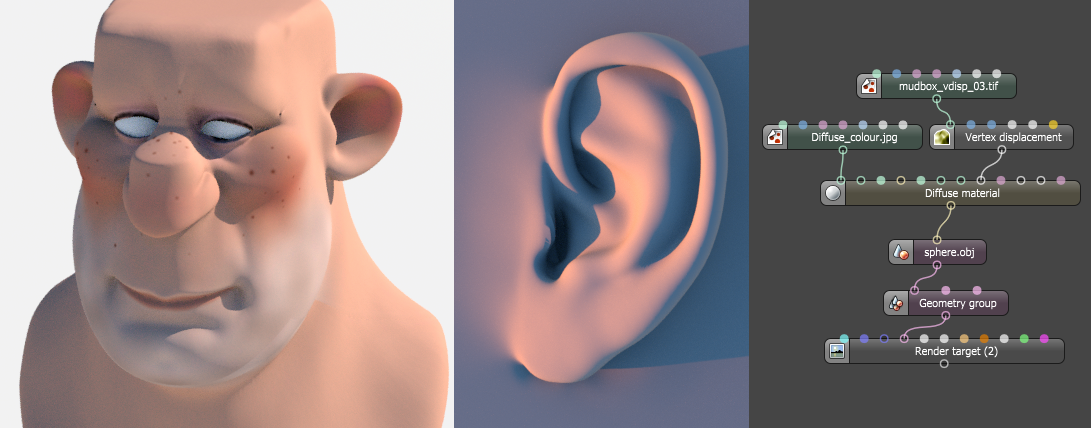
For the example on the left, a small subdivided sphere was used as the base mesh for displacement, and on the right just a subdivided plane.
Using the displacement mixer is quite simple. You can add a height map onto the vector displacement to give great surface detail:
https://render.otoy.com/downloads/9b/fe ... -mixer.png
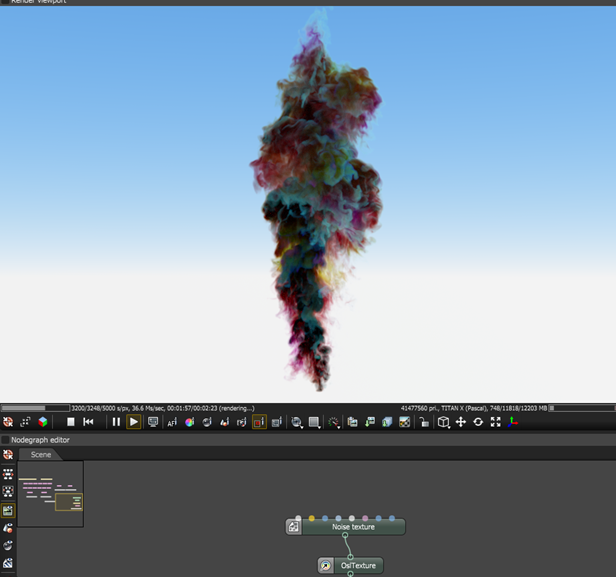
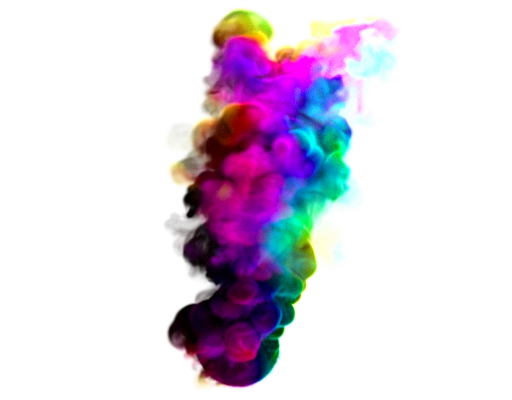
OSL Shaders for volume textures
Up until recently you could only use static colors for absorption, scattering and emission in volumes. You can now use any textures for volumes (not for mesh geometry however).
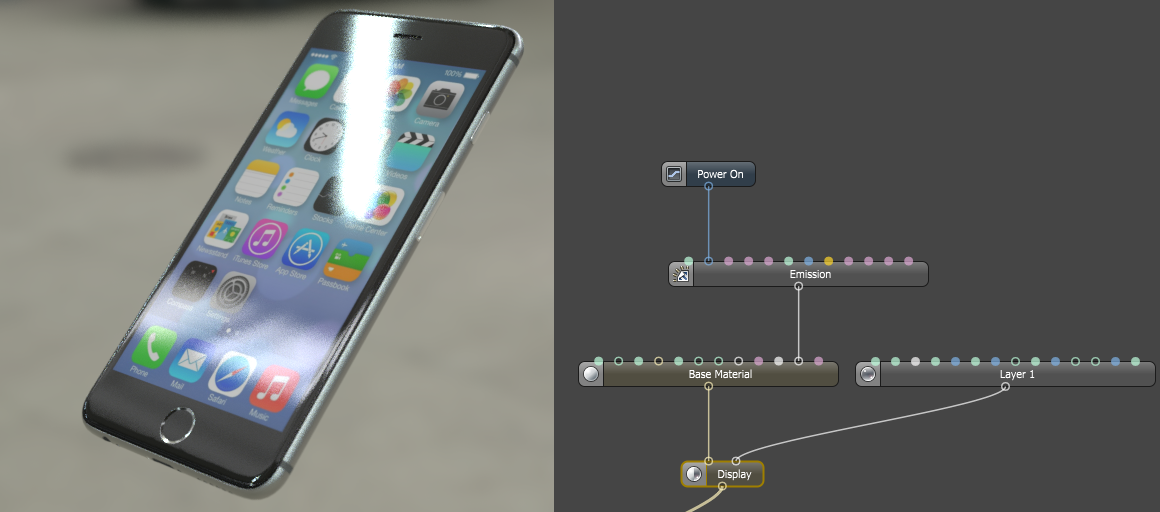
Layered material
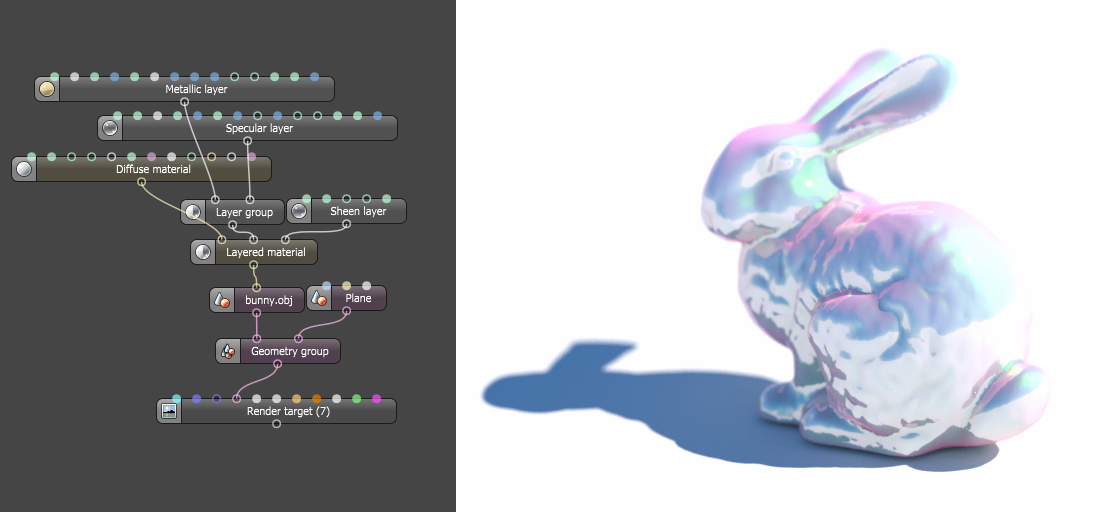
New nodes: layered material, diffuse layer, specular layer, sheen layer, metallic layer, layer group nodes.
The new layered material system allows you to construct a complex material that consists of a base layer, with a maximum of 8 layers which can be inserted on top of the base layer. We separated and exposed a set of layers (Diffuse layer, Specular layer, Metallic layer, Sheen layer) that made up the complex materials from previous Octane versions (Diffuse material, Glossy material, Specular material, Metal material, Universal material). Using this set of unique layers, Octane 2019.1 now empowers users to recreate complex materials in a physically-based manner as opposed to manually mix materials together.
From 2019.1 XB2 we will also allow adding layers on existing materials, without using the Layered Material node.
As an example of a diffuse emission layer with a specular layer on top with a phone. The specular reflection can be seen on top of the emission from the screen. The material specifies a base diffuse material with an emission node attached to it, while a specular layer is set for layer 1:
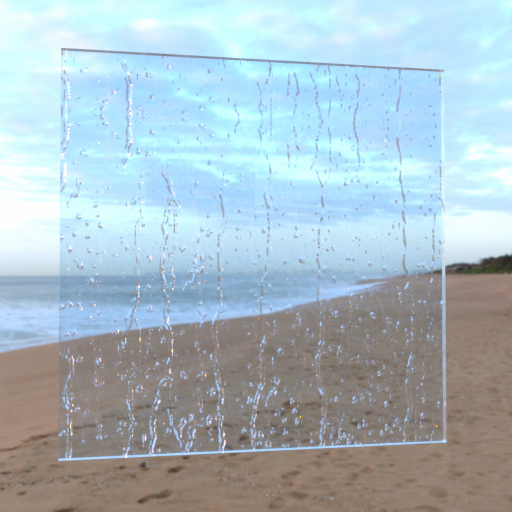
Another example, you can achieve a raindrop effect using per layer bump map and normal map perturbation. This example consists of two specular layers, with the top specular layer using a custom raindrop normal map while the bottom (the base specular layer) uses the geometry's normal:
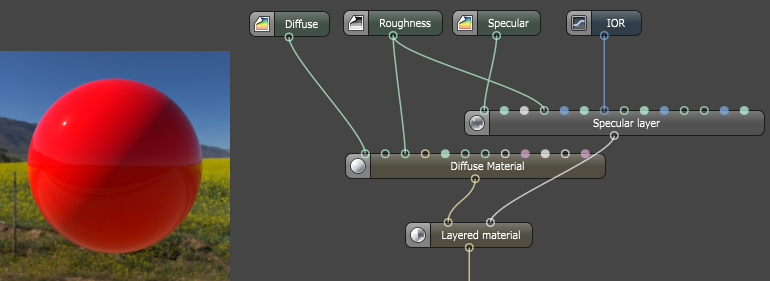
A simple example with a diffuse base layer, and a specular layer makes a realistic looking LCD panel. This effectively recreates the glossy material, with the exception of allowing you to specify an emission below the specular layer:
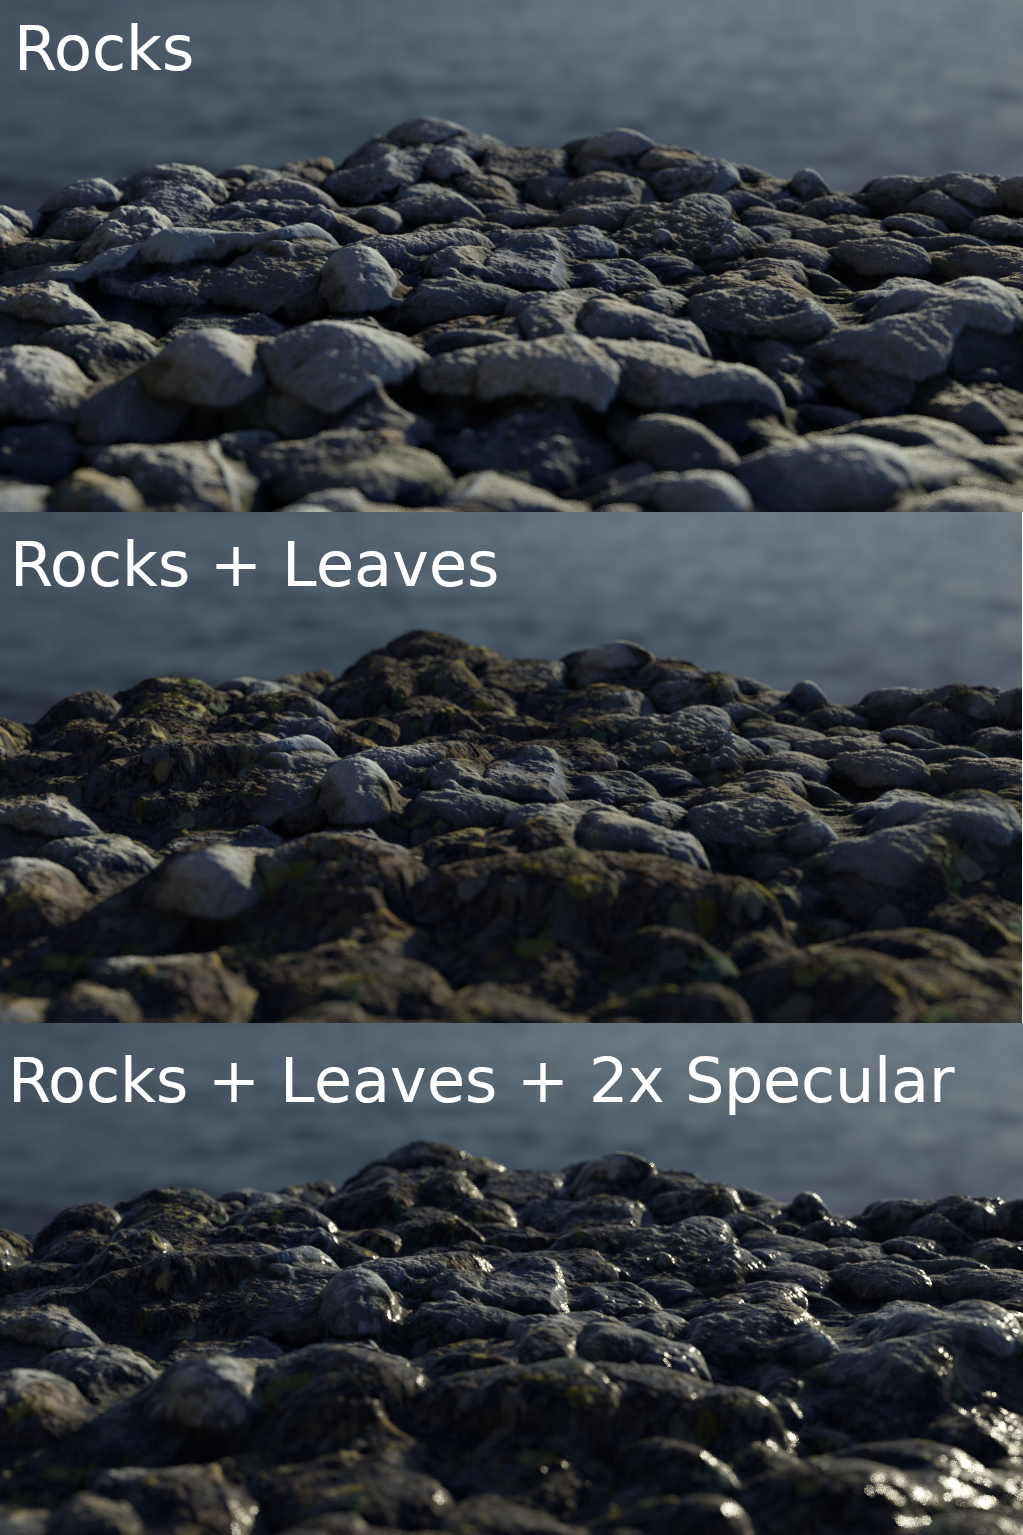
With layered material, you can layer decals on top of your base material. An example use case is terrain rendering, where the terrain is composed of 4 layers. Sitting at the bottom layer are the rocks with glossy material, then a diffuse material with leaves texture is layered on top of the rocks, and finally two additional specular layers on top for simulating specular reflection on the leaves and the low roughness specular reflection to simulate wet surface at the very top:
In this example, we show a more complicated layered material that involves the use of a layer group node. We have created a layer group node that works together with the layered material for simpler grouping of material layers to help sharing of layers between materials. You'll see a mesh that has a diffuse base material, with a dirt texture. It has 3 layers on top of it, first a semi-opaque metallic layer, followed by a rough specular layer with green reflectance, then finally a rough red sheen. The layer group groups the metallic and specular layer, and follows the order of layers in the same order as a layer material.
With the layered material, you are given all layers that are used in Octane, allowing you to reconstruct your own uber material with different permutations of base material and top layers, this allows you to recreate your complex material that suits your need.
For example, you can recreate the glossy material in Octane using a diffuse material and a specular layer:
You can also recreate the metal material that became available in Octane since 3.08, using diffuse material + metal layer:

Furthermore, you can create the PBR material used in game engines and other tools, an example of this is the simple PBR metallic/roughness workflow recreated using the layered material:

Another example of this is the recreation of a fully featured Principled BSDF shader:

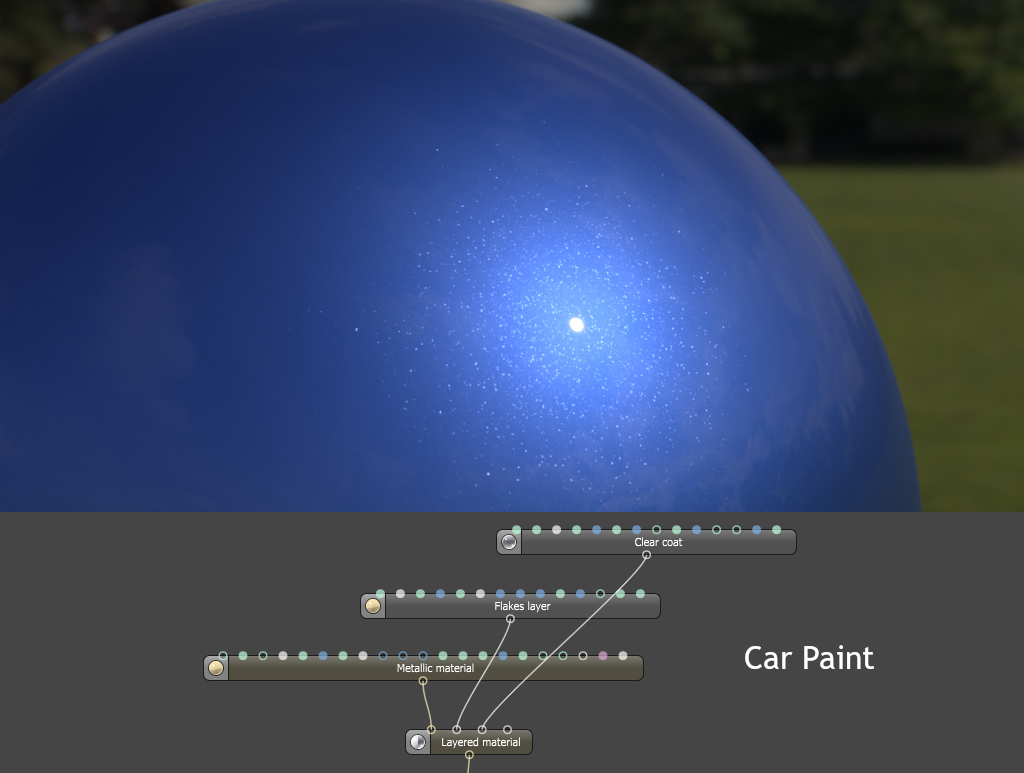
Car paint becomes quite easy to do. Below is a render of a base metallic material, with a metallic layer used for the flakes, and then a specular layer on top.
Composite material node
New node: Composite material
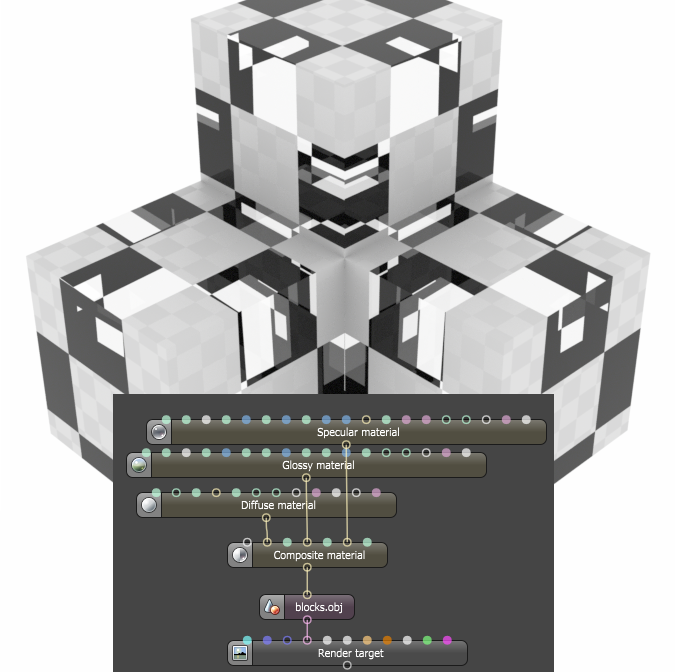
The new Composite Material node allows you to mix materials using a mask. This example shows what it looks like when you layer together diffuse, glossy and specular materials each using a checks mask with a different UVW transform. This is much easier and cleaner than a long string of mix materials, and if the mask is not given, then it will use the material's opacity map, if any. The first layer pin is the base layer.
Universal material
New option: Thin wall
New thin-wall option allow you to use a plane as specular material. Thin wall assumes the surface is infinitesimally thin and so the entry and exit point of the ray occurs at the same position, so there is no refraction rays happening upon the intersection of ray with the surface, and instead the ray shoots straight through the surface and exit in the same direction:

New rounded edges
The new rounded edges system gives you much more robust rounded corners, and more options on controlling the effect. The rounded edges settings have been replaced by a group of settings that include roundness, and different modes to apply the effect.
You have the option of using Fast rounded edges, and an Accurate mode, which is also available in concave-only and convex-only modes.
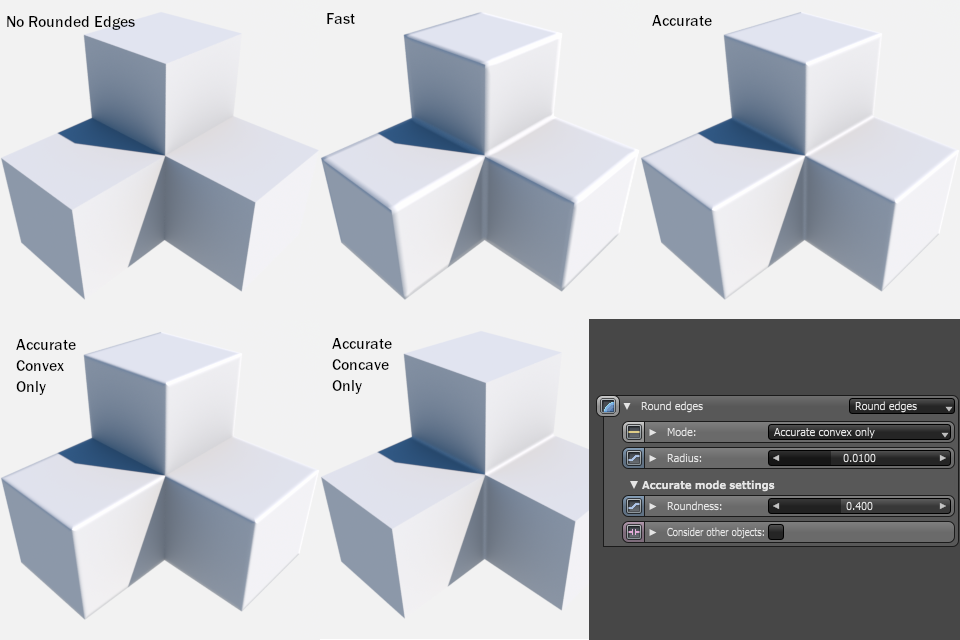
A new option
Consider other objects allows you to apply rounded edges between instances.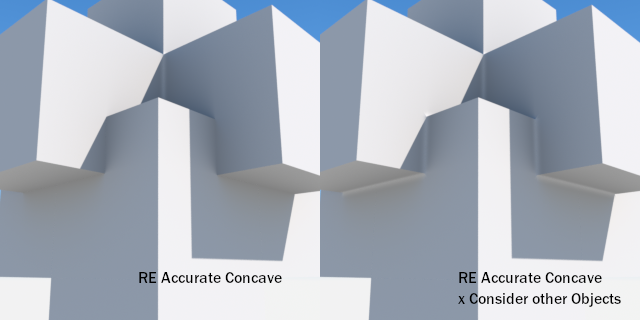
The
Roundness option allows you to control the sharpness of the edges.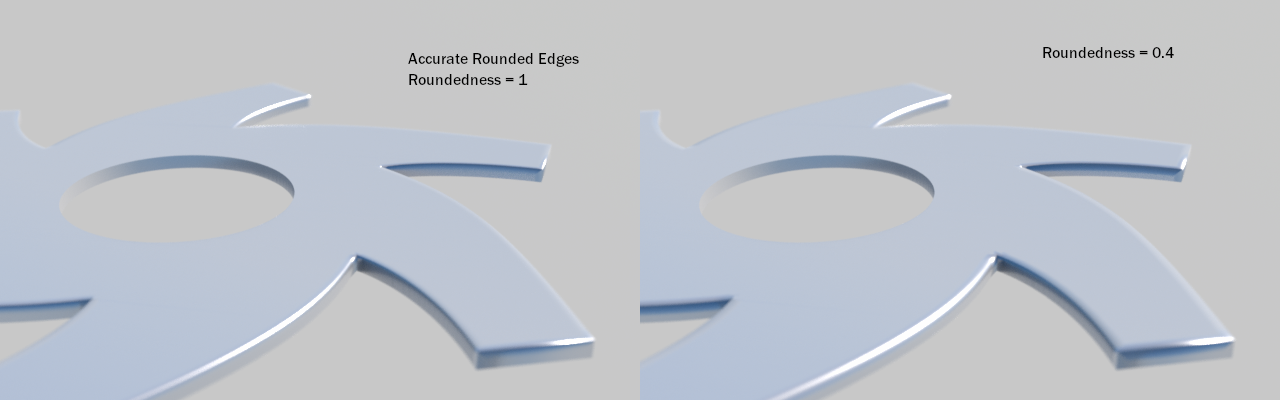
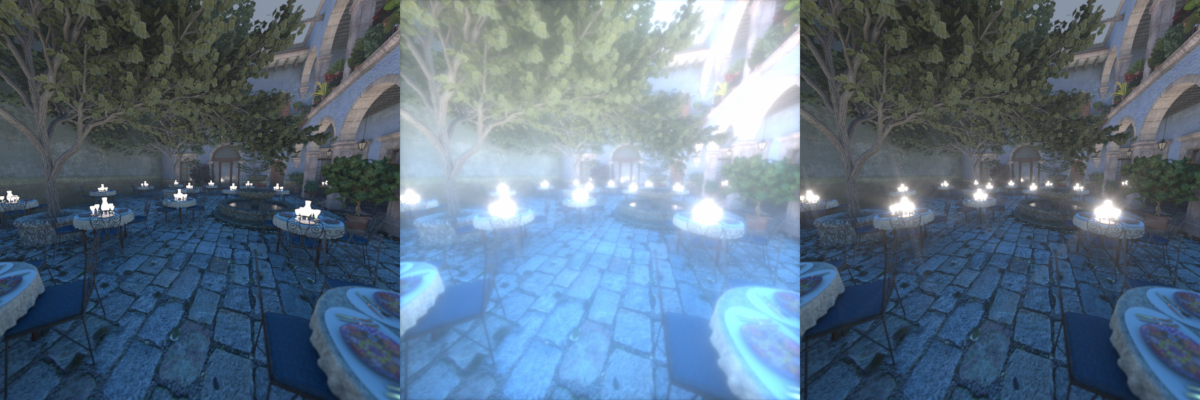
Bloom/glare threshold
You now have better control over how to apply bloom/glare, with a
Cutoff setting on the post processing node. When you want to highlight lights using a bloom or glare, and have a hidden emitter that lights the scene, quite often bloom/glare washes out the scene before you can highlight the emitters you want. In the example below, the center shows the issue, and on the right this is corrected by setting
the Cutoff to 0.4.
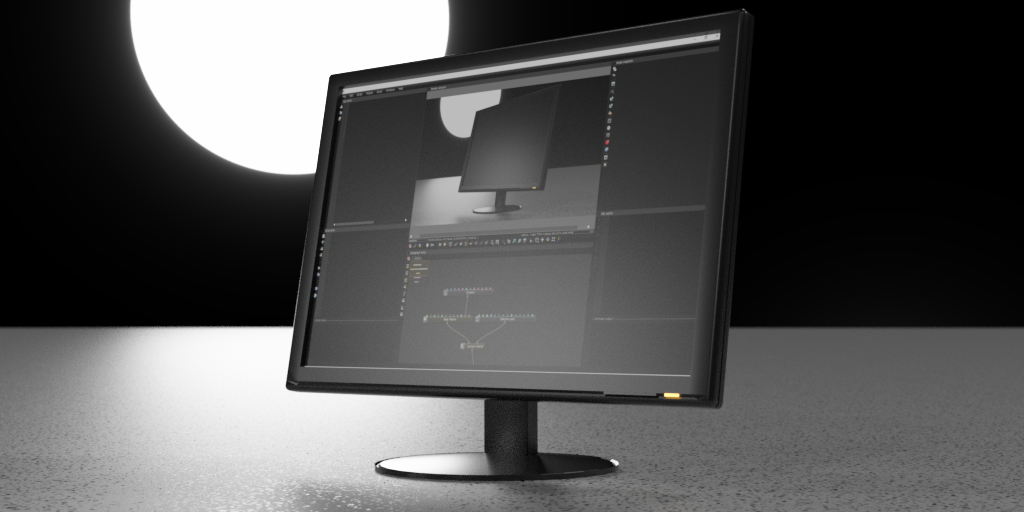
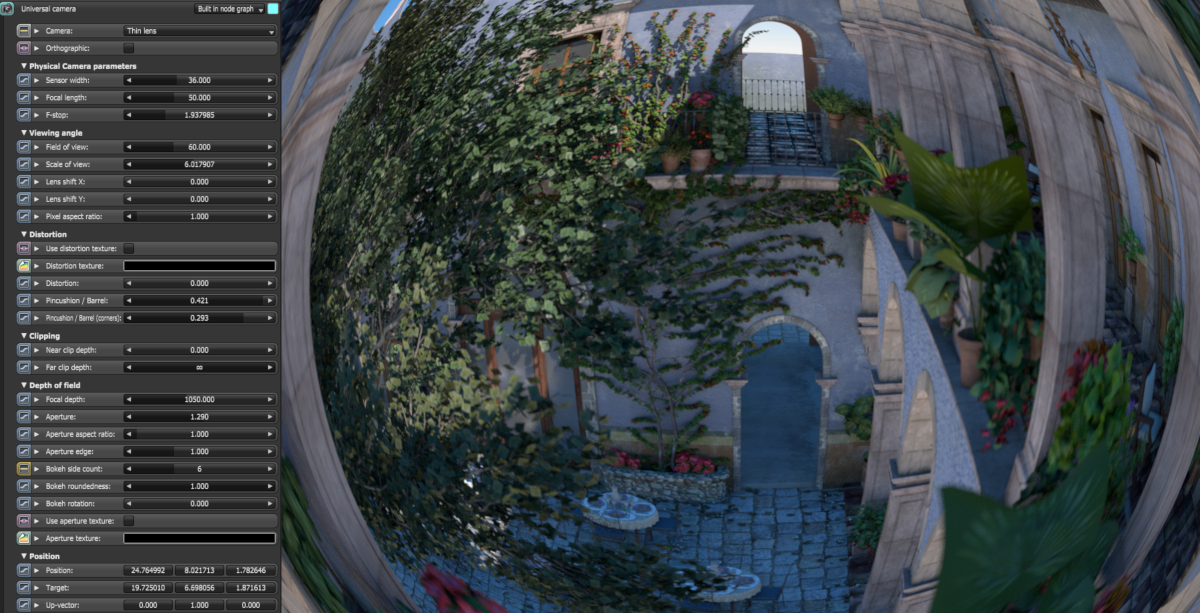
Universal camera
We added a fully featured universal camera, with support for distortion, DOF, thin lens / fisheye / abberation+distortion.
Geometric primitives
Sometimes you just need some simple geometric primitives for various purposes. We have added a set of easily accessible primitives:

AI Up-sampler
Octane 2019.1 now includes a built-in AI up-sampler in Octane Imager. The AI up-sampler works similar to the AI denoiser first introduced in Octane 4, with a progressive and a one-stop up-sampling mode. You can now specify multiple sampling modes (2x2, 4x4) up-sampling for your rendered image, and the AI up-sampling would automatically render at a lower resolution in less time and up-scale to the resolution you specified.
Below are some comparisons of the same scene rendered with different AI Up-Sampling settings:
Kernel: PathTracing
AI Up-Sampling: Off
Resolution: 1920x1080
Samples: 4000
Render Time: 13mins 44 seconds
Kernel: PathTracing
AI Up-Sampling: On
AI Up-Sampling Mode: On completion | 2x2
Resolution: 1920x1080
Samples: 4000
Render Time: 3 mins 49 seconds
Kernel: PathTracing
AI Up-Sampling: On
AI Up-Sampling Mode: Progressive | 2x2
Resolution: 1920x1080
Samples: 4000
Render Time: 4 mins 31 seconds
Spectron Volumetric spotlights
We have improved the rendering of scattering in participating media using the new step length parameter.Reducing the step length in the light medium now reduces the amount of samples per pixel you can render in a given time budget, and it also reduces the noise in the fog.
Below are examples of results with varying volumetric step length and samples per pixel:
Volumetric step length: 20
Samples per pixel: 450
Volumetric step length: 50
Samples per pixel: 700
Volumetric step length: 999
Samples per pixel: 1200
Vertex Displacement Auto-Bump Shading
The vertex displacement feature now includes an autobump option (for height map displacement only currently) to introduce more detail into the mesh without requiring high subdivision levels at all times. As we know, high subdivision levels introduces higher mesh complexity into the scene, and thus increases render time and pre-processing time per subdivided mesh.
We have introduced autobump feature for vertex displacement so that details within a triangle is preserved without excessively subdivide a triangle continuously to get the displacement details you want. Basically the extra detail of a triangle is moved into shading space by generating a bump map from the displacement map, and the normals inside a triangle is perturbed from this automatically generated bump map during render time, similar to the normal workflow of bump map in Octane.
Below are some examples of the feature:
Subdivision level 6 vs Subdivision level 6 + autobump
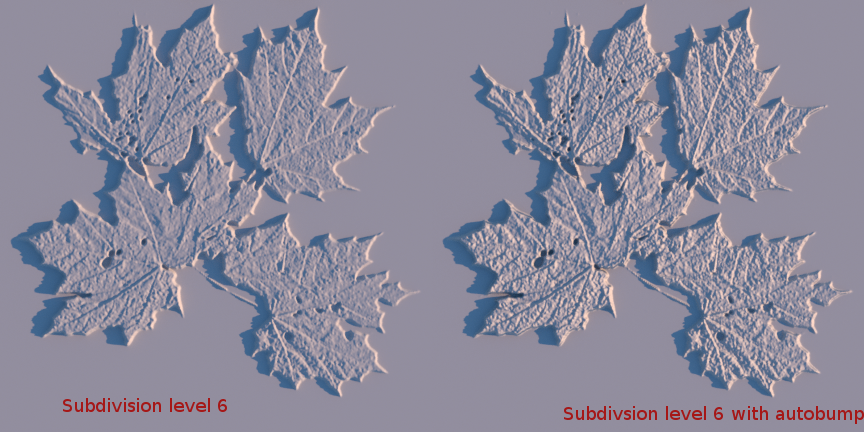
As shown above, the autobump can introduce extra details for a subdivision level that the particular subdivision cannot provide sufficiently.
Subdivision level 6 vs Subdivision level 3 vs Subdivision level 3+ autobump
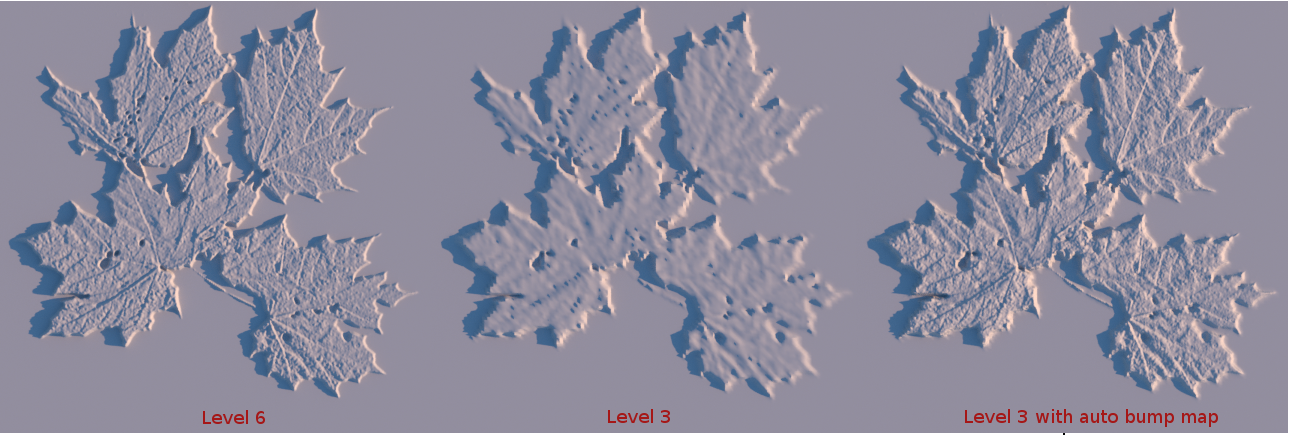
In this second image, we can see that a lower subdivision level (level 3) shows poor detail compared to a higher subdivision level (level 6), but the discrepancy can be made up by the autobump feature without introducing a higher subdivision level.
Downloads
Downloads for users with an Enterprise subscription license
OctaneRender Enterprise 2019.1 (Windows installer)
OctaneRender Enterprise 2019.1 (Windows zip)
OctaneRender Enterprise 2019.1 (Mac OS)
OctaneRender Enterprise 2019.1 (Linux)
Downloads for users with a Studio subscription license
OctaneRender Studio 2019.1 (Windows installer)
OctaneRender Studio 2019.1 (Windows zip)
OctaneRender Studio 2019.1 (Mac OS)
OctaneRender Studio 2019.1 (Linux)
Demo Downloads
OctaneRender Demo 2019.1 (Windows installer)
OctaneRender Demo 2019.1 (Windows zip)
OctaneRender Demo 2019.1 (Mac OS)
OctaneRender Demo 2019.1 (Linux)
Happy rendering
Your OTOY NZ team


