Page 1 of 1
Pretty realistic Exteriors I finished
Posted: Sun Jun 15, 2014 2:00 am
by charlesp2
Pretty realistic (i think) Exteriors I finished.
Rendertime around 14 min on Dual GTX780's. Max plugin. PMC @ around 3000 samples.
First the night shot:

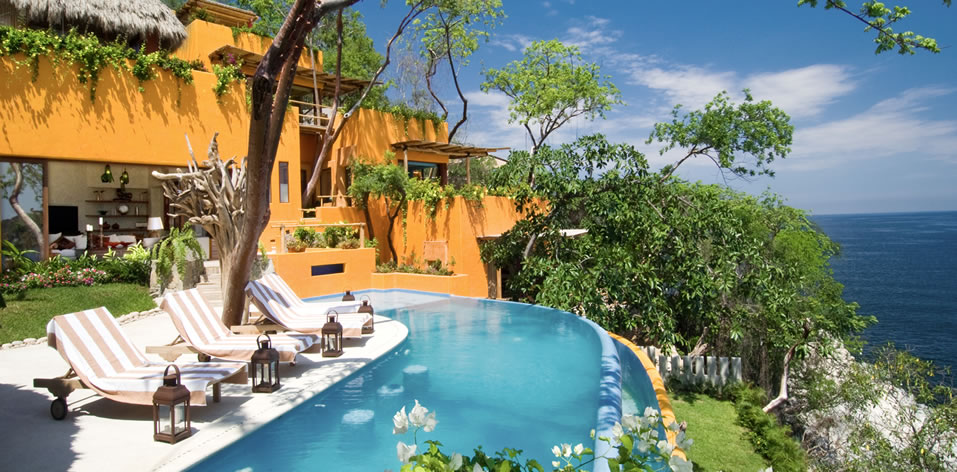
Now the day shots:


 All comments/crits welcome
, I'm a new Octane user (1 week) and looking for ways to improve!

(ps - so far i'm loving Octane for Exterior shots, interiors don't really work well for octane... even with pmc takes too much time/noise. vray really beats it for interiors).
Re: Pretty realistic Exteriors I finished
Posted: Sun Jun 15, 2014 5:51 pm
by bbeepp
Get rid of the woman from the last picture.
Work more on lighting - epecially on daylight views.
Get more detail to the outside ground - more plants, objects and ground detail.
Get rid of blurry (low depth of field) - this gives a toyish, tiltshift look.
Find a good backdround picture.
Take your render to photoshop or other similar software and play with colors, contrast etc.
Take a look at fotos and renders you can find on the web eg:
Re: Pretty realistic Exteriors I finished
Posted: Sun Jun 15, 2014 11:36 pm
by ROUBAL
The first images are better than previously, but if you absolutely want to keep the woman in the last picture, use a 3D character, or do some Photoshop work.
It is really necessary, because the flat cut-out at the bottom completely breaks the illusion, and also some reflections of lights from the caustics and the flames are necessary, as well as some transparency to show the legs a little bit.
I have done a fast test to show you what I mean :
Re: Pretty realistic Exteriors I finished
Posted: Mon Jun 16, 2014 12:57 am
by kavorka
I also think that the glare value is too high. Might want to make it a more subtle effect. Also, try to render the images at a larger resolution, then resize to what you want. You will get a much nicer image that way.
One of the least realistic features is the stone walls. You could use the image to create a normal map (I use Nvidia's free photoshop feature, but you could get crazy bump and try that.) or even use displacement if you have 2.0.
Re: Pretty realistic Exteriors I finished
Posted: Tue Jun 17, 2014 9:47 am
by Heelie
Why did u open a new Thread?
Those renders are still not very realistic. Especially the environment. Too much depth of field. Realistically it looks like a small scale model. The night shot looks the most convincing cause u dont see the environment in detail.
The Poolbabe is a very obvious Photoshop (or plane cut out) so i would leave that out at least for the client.
Re: Pretty realistic Exteriors I finished
Posted: Tue Jun 17, 2014 1:10 pm
by bicket
My only crit is that you don't listen to our comments, so your images are the same as the WIP.
Re: Pretty realistic Exteriors I finished
Posted: Wed Jun 18, 2014 8:51 am
by mbetke
When I learn new stuff I take a look what others have done and try to reach this level or get a lot of photo references for inspiration.
Most of the things in our daily business is really technical stuff like working in proper measures, know how to set up proper tiling and materials plus do a 3D model in a certain scale without 5m height doors and so on.
So you you could d oa quick image search vor "desert villa" on Flickr or Google. You can concentrate on a certain aspect of you project like doing a proper wall material which looks like on you photo reference. If you get a feeling for it you can proceed to your next step like mimic the same lighting as seen on you refernce image.
This will improve you overall skills step by step and you can migrate this knowledge to other projects with a long term benefit.

Re: Pretty realistic Exteriors I finished
Posted: Thu Jun 19, 2014 8:35 am
by glimpse
mbetke wrote:
So you you could d oa quick image search vor "desert villa" on Flickr or Google. You can concentrate on a certain aspect of you project like doing a proper wall material which looks like on you photo reference. If you get a feeling for it you can proceed to your next step like mimic the same lighting as seen on you refernce image.
This will improve you overall skills step by step and you can migrate this knowledge to other projects with a long term benefit.
Wise words from someOne who's doing archViz for living.